The ipconfig (short for IP Configuration) is a basic, yet popular, Windows network command-line utility used to display the TCP/IP network configuration of a computer. If you are familiar with Linux, this tool is similiar to ifconfig. This tool is often used for troubleshooting network connectivity issues. With ipconfig, you can identify the types of network adapaters on your computer, the computer's IP address, the IP addresses of the DNS (Domain Name System) servers being used, and much more.
These commands shown here are tested on a comptuer with Windows 10 but most will work in other versions of Windows as well.
Table of Content
- Overview
- How to Launch Command Prompt
- Ipconfig Syntax
- Ipconfig Parameters
- Example Usage
- ipconfig - Retrieves Basic TCP/IP Network Information (IP, subnet mask, gateway)
- ipconfig /all - Retrieves All TCP/IP Network Information (MAC address, adapter description, DHCP details)
- ipconfig /release - Releases the IPv4 Address of All Network Adapters
- ipconfig /release6 - Releases the IPv6 Address of All Network Adapters
- ipconfig /release <adapter> - Releases the IP Address of a Specific Network Adapter
- ipconfig /renew - Get a New IPv4 Address for All Network Adapters
- ipconfig /renew6 - Get a New IPv6 Address for All Network Adapters
- ipconfig /renew <adapter> - Get a New IPv4 Address for a Specific Network Adapter
- ipconfig /displaydns - View DNS Cache
- ipconfig /flushdns - Purge DNS Cache
- ipconfig /all | findstr /v 00-00-00 | findstr Physical - Display MAC Address of Only Physical Connected Network Adapters
- Other Usages and Getting Help
- Tips
- Recommended Reading
- Summary
Overview
The ipconfig is a Windows command-line utility used often to troubleshooting computer network issues. If you are a Linux user, this utility is similar to ifconfig. This is often used to determine the local IP address, subnet mask, the gateway address, and other network configuration of a computer. Additionally, this tool is used to refresh DHCP (Dynamic Host Configuration Protocol) and DNS (Domain Name System) settings
While most of the information provided by the ipconfig command-line utility can be found via a more user-friendly graphical interface, sometimes that interface may not be available and command prompt is your only available option. If you are a help desk technician or a network professional, it is recommended that you understand the command-line method of retrieving a computer's network configuration, and it some cases, performing network functions.
How to Open Command Prompt
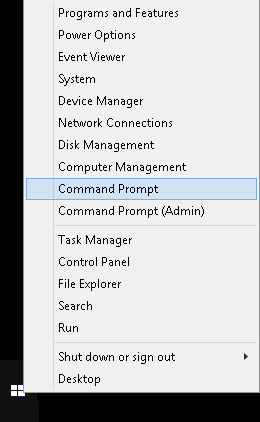
To use this utility, you will need to launch the Command Prompt window. The three common ways to launch the Command Prompt window are:
- Search for
cmdusing the built-in Windows search tool. - Right-click on the Start icon and select Command Prompt.
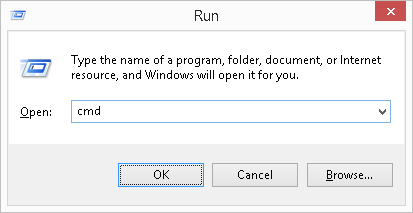
- Press the keyboard combination WinKey + R, then type
cmdat the Run window that appears.
Ipconfig Syntax
ipconfig [/allcompartments] [/all] [/renew [<Adapter>]] [/release [<Adapter>]] [/renew6[<Adapter>]] [/release6 [<Adapter>]] [/flushdns] [/displaydns] [/registerdns] [/showclassid <Adapter>] [/setclassid <Adapter> [<ClassID>]]>
Ipconfig Parameters
| Parameter | Description |
|---|---|
| /all | Display the full TCP/IP configuration information for all network adapters. |
| /release | Release the IPv4 address for the specified adapter. |
| /release6 | Release the IPv6 address for the specified adapter. |
| /renew | Renew the IPv4 address for the specified adapter. |
| /renew6 | Renew the IPv6 address for the specified adapter. |
| /flushdns | Purges the DNS Resolver cache. |
| /registerdns | Refreshes all DHCP leases and re-registers DNS names. |
| /displaydns | Display the contents of the DNS Resolver Cache. |
| /showclassid | Displays all the DHCP class IDs allowed for adapter. |
| /setclassid | Modifies the DHCP class ID. |
| /showclassid6 | Displays all the IPv6 DHCP class IDs allowed for adapter. |
| /setclassid6 | Modifies the IPv6 DHCP class ID. |
| /? | Displays help information. |
Example Usage
There are a variety of switches (sub commands) available with the ipconfig utility that will either display certain information or perform certain network functions. At the most basic, the ipconfig displays a computer's IP address, subnet mask and the default gateway (which is typically the IP address of your router or network firewall).
ipconfig - Retrieve Basic TCP/IP Network Information
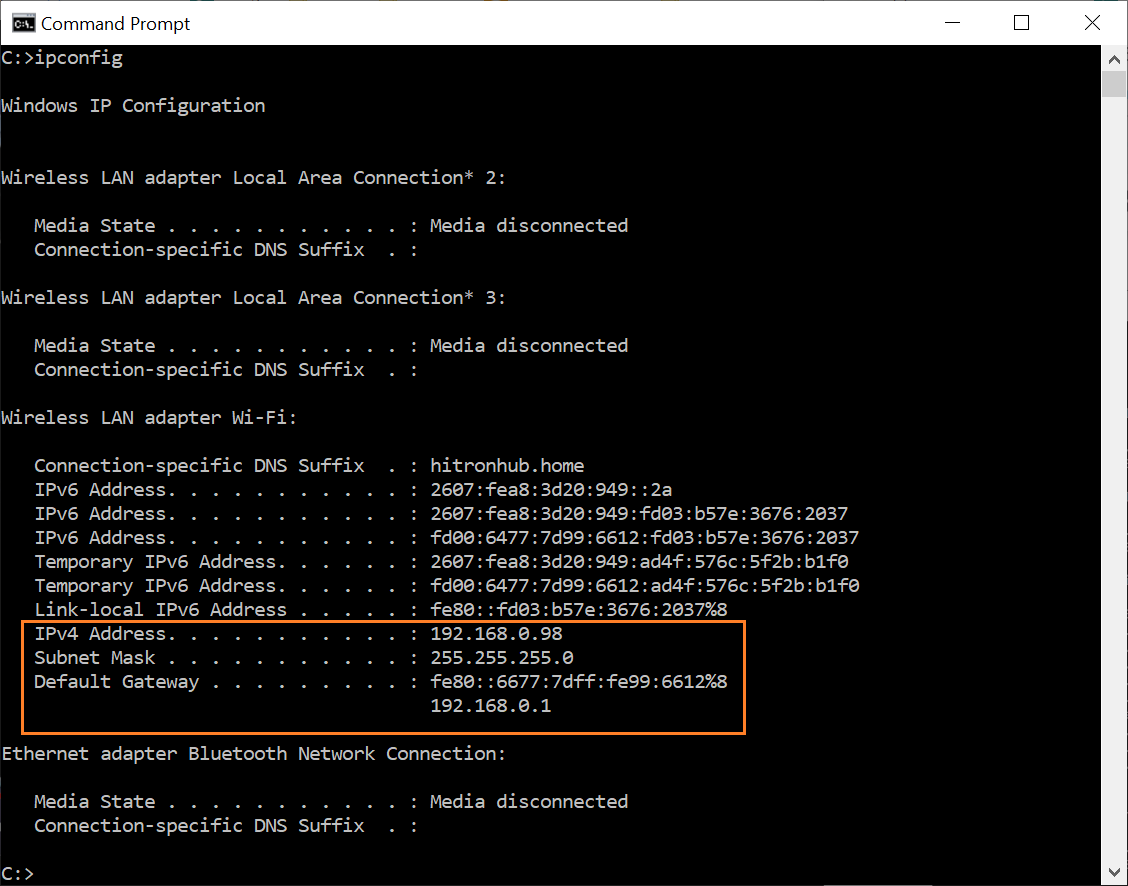
To get basic network information from your computer, type the following in the command window then press Enter: ipconfig
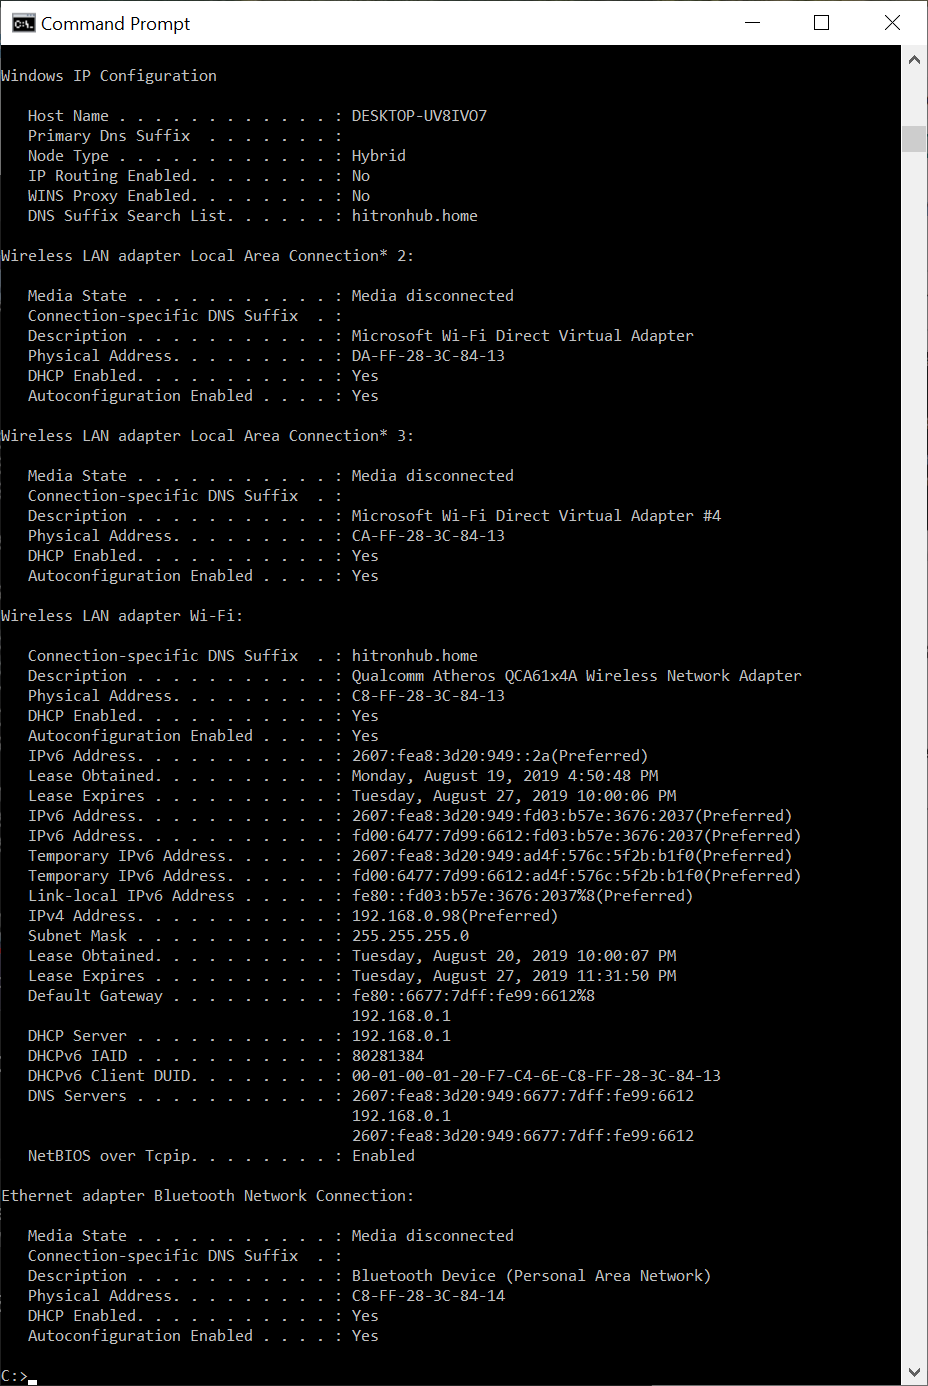
The screenshot example below is the ipconfig output of a particular computer. The output of your ipconfig result will differ depending on your network setup and the type of network adapters installed on your computer. In our screenshot example, it shows the following basic networking information about the computer from which ipconfig was ran.
- IPv4 address: 192.168.0.98
- Network subnet mask: 255.255.255.0
- Default Gateway: 192.168.0.1
Please note that unless your computer is connected directly to the Internet (this is rare), the IP address reported by ipconfig will be your local network IP, not your public external IP address.
While other network details can be retrieved by the ipconfig utility, for most network troubleshooting, this is what is typically needed.
ipconfig /all - Retrieve All TCP/IP Network Information
Another useful switch with ipconfig is to have it report all TCP/IP network details for all network adapters on a computer. This is accomplished by using the /all switch. This switch provides you with the same basic information as ipconfig described above, but with a lot more detail. To retrieve all network information about your computer, type the following in the command window then press Enter: ipconfig /all
This will show a detailed report of various network details for the computer. Again, your report will differ depending on your network setup and the network adapters installed on your computer. This report includes information such as:
- Make and model of your network adapter(s)
- Physical address (also known as the MAC address or hardware address) of your adapter(s)
- Whether your IP address is leased (i.e., DHCP issued or statically assigned)
- If IP address is leased, what the lease expiration and the DHCP that leased it
- DNS servers
As you can see, ipconfig /all provides you with a plethora of details about your computer network setup.
MAC Address (OUI) Lookup Tool
A MAC address is made up of six (6) octets. The first three octets indicate the manufacturer of the network adapter. Use this MAC Address (OUI) Lookup Tool to find the manufacturer of your adapter.
ipconfig /release - Releases the IPv4 Address of All Network Adapters
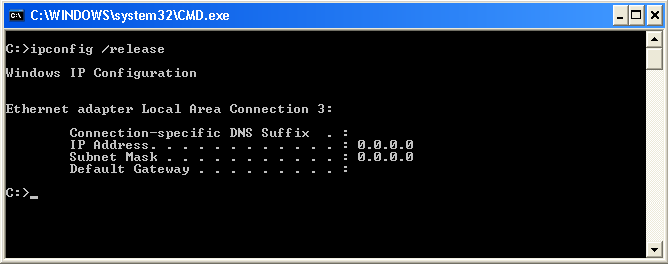
The /release switch will cause ipconfig to go through the network adapters you have and drop the dynamically issued IPv4 address by sending a DHCPRELEASE message to the DHCP server. For the majority of the time, you would follow this command with ipconfig /renew (described below) will cause your network adapters to reach out to your DHCP server for an IP address (it can be a new IP address or the same IP you had prior to when you performed the /release command). For most, executing this command does not have adverse effect on your computer.
To release your IP address from your computer, type the following in the command window then press Enter: ipconfig /release
Note, if you have a statically assigned (manually assigned) IP address, this command will not release it. See example ipconfig /renew for related information.
ipconfig /release6 - Releases the IPv6 Address of All Network Adapters
The command is similar to ipconfig /release except it renews the IPv6 address on the adapters.
ipconfig /release <adapter> - Releases the IPv4 Address for a Specific Network Adapters
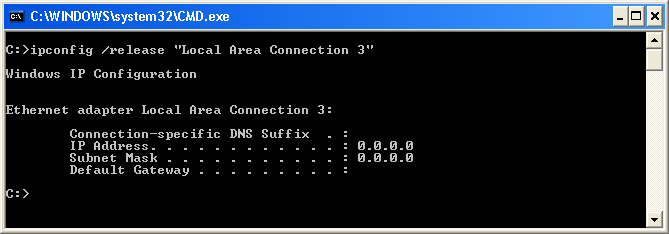
The /release <adapter> switch will cause ipconfig to drop the dynamically issued IPv4 address by sending a DHCPRELEASE message to the DHCP server for a specific network adapter.
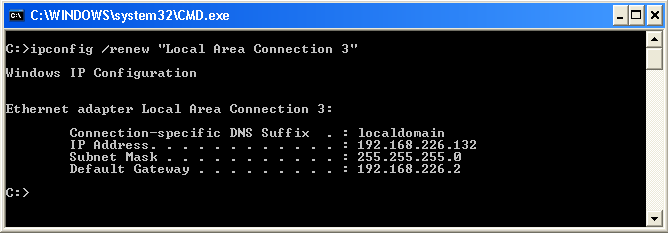
To release the IP address for a specific network adapter on your computer named "Local Area Connection 3", type the following in the command window then press Enter: ipconfig /release "Local Area Connection 3"
Note, if you have a statically assigned (manually assigned) IP address, this command will not release it. See example for ipconfig /renew for related information.
ipconfig /renew - Get a New IPv4 Address for All Network Adapters
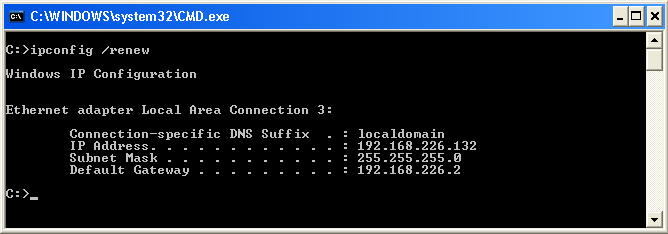
The ipconfig /renew will cause your computer to reach out to your DHCP server for an IPv4 address if it doesn't already have one or renews an existing one for all network adapters. Depending on how your DHCP server is configured or the pool of available addresses, the IP address you will receive can be one you had previously or it can be a new IP address. Once you execute this command, it will typically take just seconds for a DHCP to assign your computer with an IP address. In the illustration below, the IP address assigned to this computer is 192.168.226.132.
To renew the IP address of your computer, type the following in the command window then press Enter: ipconfig /renew
See example for ipconfig /release for related information.
ipconfig /renew6 - Get a New IPv6 Address for All Network Adapters
The command is similar to ipconfig /renew except it renews the IPv6 address on the adapters.
ipconfig /renew <adapter> - Get a New IPv4 Address For a Specific Network Adapter
The ipconfig /renew <adapter> will cause your computer to reach out to your DHCP server for an IPv4 address if it doesn't already have one or renews an existing one for a specific network adapter. Depending on how your DHCP server is configured or the pool of available addresses, the IP address you will receive can be one you had previously or it can be a new IP address. Once you execute this command, it will typically take just seconds for a DHCP to assign your computer with an IP address. In the illustration below, the IP address assigned to the network adapter named "Local Area Connection 3" is 192.168.226.132.
To renew the IP address for a network adapter on your computer named "Local Area Connection 3", type the following in the command window then press Enter: ipconfig /renew "Local Area Connection 3". To find out the name(s) of the network adapters on your computer, type the following in the command window then press Enter: ipconfig
See example for ipconfig /release for related information.
ipconfig /all | findstr /v 00-00-00 | findstr Physical - Display MAC Address of Only Physical Connected Network Adapters
The ipconfig utility, with the /all switch, is often used to find the MAC address (the 6-byte 'burned-in' physical/hardware address) of network adapters. While this does the job, the output shows a plethora of information as mentioned above. If you have multiple adapters, the output can be lengthy making it cumbersome to find what you are looking for.
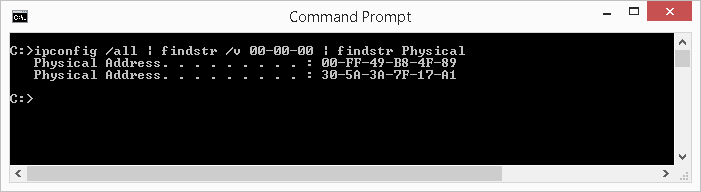
The Windows findstr utility is used to search for patterns of text. By feeding the output of ipconfig /all into findstr, we can significantly reduce the clutter and have the output show only the MAC address of physical network adapters. To accomplish this, type the following in the command window then press Enter:
ipconfig /all | findstr /v 00-00-00 | findstr Physical
This command is actually a series of three commands, namely:
ipconfig /allfindstr /v 00-00-00findstr Physical
The vertical bar (|), more commonly referred to as the pipe, is a 'command' that takes the output from the left side of the pipe and feeds it as input to the command on the right, bypassing the computer screen.
As the above command shows, the output of ipconfig /all is funneled into the command findstr /v 00-00-00 as its input. The findstr with the /v switch will look for lines of text in the output of ipconfig /all that does not contain 00-00-00. What this does is exclude any network adapters that are disabled or not connected. These network adapters will have MAC address that starts with 00-00-00.
The result from the first findstr will still contain a lot of information that we can further filter out, such as DHCP lease information. To further reduce clutter to ultimately end up with an output that lists only MAC address of physical adapters, we will need to funneled the output of the first findstr into a second findstr command. This second findster will filter out every line of text except those that has the word Physical.
This series of commands produce an output that is concise to show only the MAC address of connected network adapters. As the illustration below shows, this is a much more easier report to read as oppose to using just using ipconfig /all.
ipconfig /displaydns - View DNS Cache
When you visit a website using it's domain name (e.g., www.meridianoutpost.com), your computer will need to know the IP address for that website in order for it to find it the server hosting it on the Internet. The process of identifying the IP address is called DNS lookup (analogous to looking up a number in a phone book). Once your computer learns the associated IP address for the website you want to visit, it will cache it (store it) on your computer. The purpose of caching it is to improve performance by not having your computer perform a DNS lookup each time you access a web page on the website.
This command will list all the currently cached IP addresses on your computer (also referred to as the DNS resolver cache). If you've accessed a lot of websites since turning on your computer, this list can be very lengthy. The illustration below shows just a few entries out of many for a particular computer. If you just turned on our computer and have not access websites or servers on the network on the Internet, then you list will only show a "localhost" setting in your local hosts file.
To display cached DNS entries on your computer, type the following in the command window then press Enter: ipconfig /displaydns
This command is typically used to troubleshoot specific DNS lookup issues. See example for ipconfig /flushdns for related information.
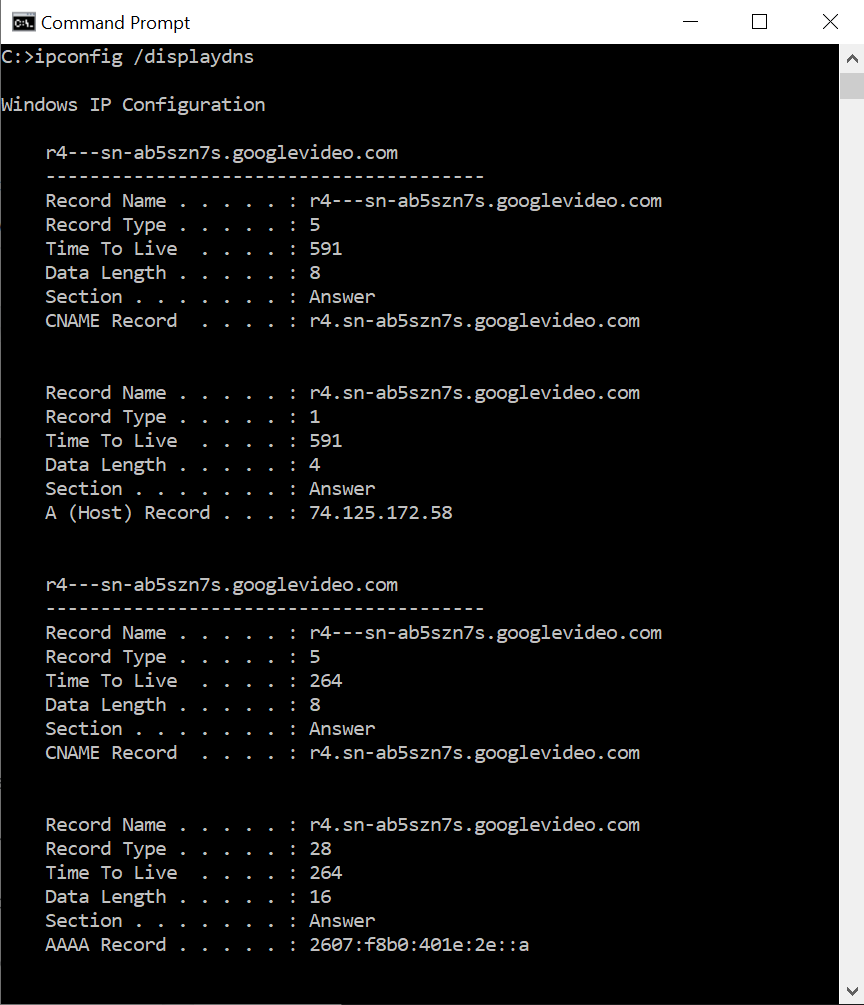
The information displayed on the list include:
- Record Name: the name of the website or server that a DNS lookup was performed on
- Record Type:
- 1 = A
- 2 = NS (indicates the entry is a name server)
- 5 = CNAME (stands for canonical name and is a type of record that maps an alias name to a true domain name)
- 15 = MX (indicates the entry is an email server)
- Time to Live: the time (in seconds) before this cache entry expires (can be as short as a few minutes to a few days)
- Data Length: the length (in bytes)
- 8 Bytes = IPv4 address
- 16 Bytes = IPv6 address
ipconfig /flushdns - Purge DNS Cache
This command will purge the cached DNS entries on your computer. You would typically do this to troubleshoot DNS related problems. An example of this is when you try to access a website but you encounter an error message stating the website is not found. For most people, executing this command does not have adverse effect on your computer. See example for ipconfig /displaydns for related information.
To delete all the cached DNS entries on your computer, type the following in the command window then press Enter: ipconfig /flushdns

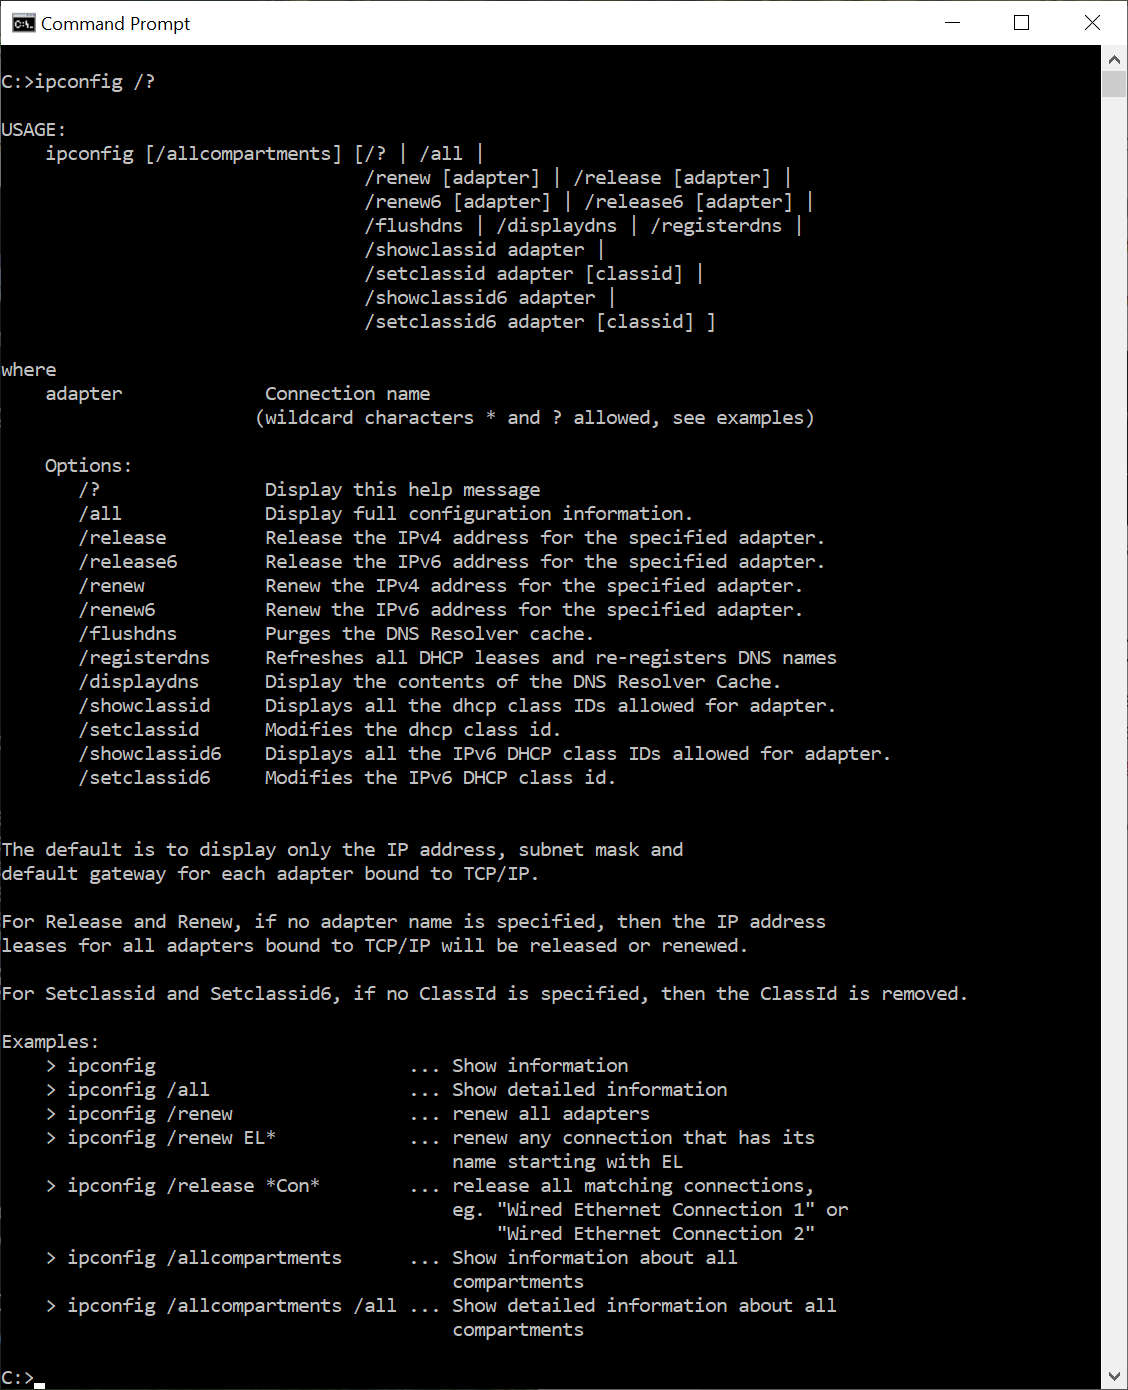
Other Usages and Getting Help
The example usage described in the article shows only some of the functions available with ipconfig. To get a list of the available switches, type the following in the command window then press Enter: ipconfig /?
Tips
Redirect Output to Text File
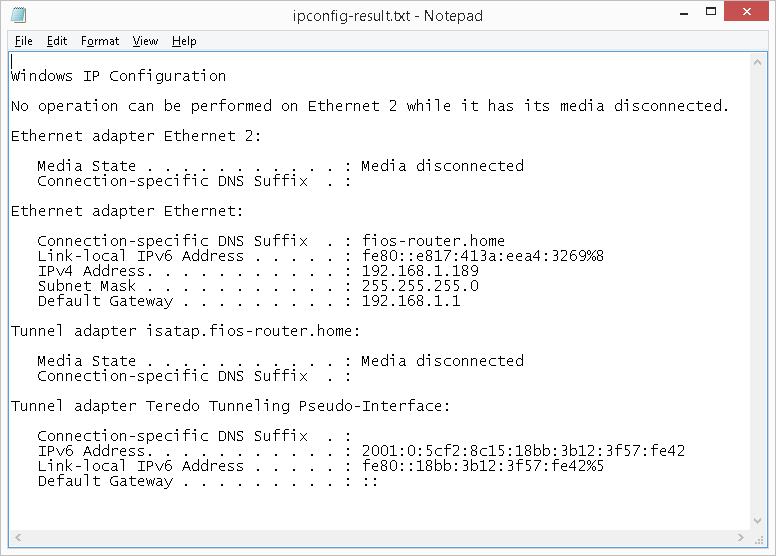
- Instead of displaying the results on the screen, you can have the results saved automatically to a text file on your computer. To do this, simply use the ">" symbol followed by the folder path and file name of your choice. For example, to redirect the output of ipconfig /renew, type the following in the command window then press Enter:
ipconfig /renew > c:\temp\ipconfig-results.txt
This will create a file named ipconfig-results.txt in the folder path c:\temp that will have your result. You can then open this file with any text editor, such as Notepad on a Windows computer, as illustrated below.
Recommended Reading
Improve confidence and job performance
Improve productivity and efficiency
Learn more,
earn more
Life-long
investment
An investment in knowledge always pays the best interest.


Summary
The ipconfig utility can provide a wealth of information for troubleshooting network issues. This utility is a valuable resource for computers that obtains an IP address automatically. If you are helpdesk technician, network administrator, or system administrator, this is a great utlity to become familiar with.
Back to Top