The tracert (which is short for trace route) is a Windows network command-line utility used to help diagnose network routing issues. If you are familiar with Linux, this tool is similar to traceroute. With tracert, you can learn details about each router (hop) that make up your network connection pathway to a remote device. It can help to determine why your connections may be poor and can help you identify where exactly the problem is.
These commands shown here are tested on a computer with Windows 10 but most will work in other versions of Windows as well.
Table of Content
- Overview
- How to Launch Command Prompt
- Tracert Syntax
- Tracert Parameters
- Example Usage
- tracert <IP Address> - Perform a Trace Route to a Specific IP Address
- tracert <URL> - Perform a Trace Route to a Specific Website
- tracert -h - Set the Maximum Number of Hops to Trace
- tracert -d - Skip Reverse Lookup to Speed Up Tracert
- Reading tracert Results
- Analyzing tracert Results
- Other Usages and Getting Help
- Tips
- Recommended Reading
- Summary
Overview
The tracert utility is a Windows command-line tool used to diagnose network issues. It is used to report pathway between one network device to another. By using tracert, we can identify the route your connection takes to reach the remote device. The network pathway typically requires traversing multiple routers (refer to as hops) to reach the remote device. This makes troubleshooting network connectivity issues a bit more involved as there are many devices that can contribute to the problem. With the tracert tool, you'll be able to check on connection problems with ease as it can help you identify the specific device that is causing problems. It will trace the pathway your connection takes to the destination by providing information on each device (typically a router) and on its progress.
It is important to be aware that tracert result is a single snapshot of the network at the time it was performed. You should perform tracert multiple times to ensure you have a fair sampling of data to use in your troubleshooting efforts.
How to Open Command Prompt
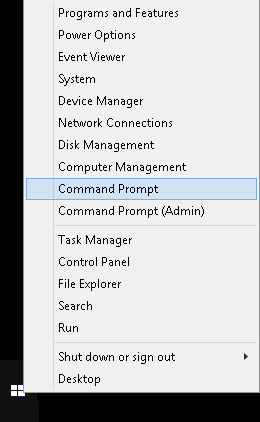
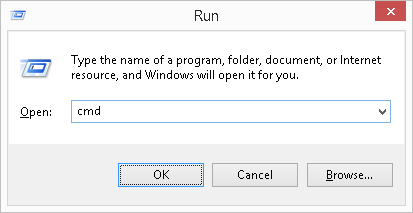
To use this utility, you will need to launch the Command Prompt window. The three common ways to launch the Command Prompt window are:
- Search for
cmdusing the built-in Windows search tool. - Right-click on the Start icon and select Command Prompt.
- Press the keyboard combination WinKey + R, then type
cmdat the Run window that appears.
Tracert Syntax
tracert [-d] [-h <MaximumHops>] [-j <Hostlist>] [-w <timeout>] [-R] [-S <Srcaddr>] [-4][-6] <TargetName>
Tracert Parameters
| Parameter | Description |
|---|---|
| -d | Do not resolve addresses of intermediate routers to their hostnames. This can speed up tracert performance. |
| -h maximum_hops | Set the maximum number of hops in the path to search for target. Default is 30 hops. |
| -j host-list | Loose source route along host-list (IPv4-only). With loose source routing, successive intermediate destinations can be separated by one or more routers. The maximum number of addresses of names is the host list is nine (9). The hostlist is simply a series of IP addresses in dotted decimal notation (e.g., 192.168.128.8) each separated by spaces. This parameter is only for IPv4 addresses. |
| -w timeout | Set the amount of time (in milliseconds) to wait for each reply. |
| -R | Trace round-trip path (IPv6-only). |
| -S srcaddr | Source address to use (IPv6-only). |
| -4 | Force tracert to use IPv4 for the trace. |
| -6 | Force tracert to use IPv6 for the trace. |
| TargetName | Specifies the destination, either an IP address or a host name. |
| /? | Displays help information. |
Example Usage
There are a variety of switches (sub commands) available with the tracert utility that allows your to configure how it behaves
tracert <IP Address> - Trace Route to a Specific IP Address
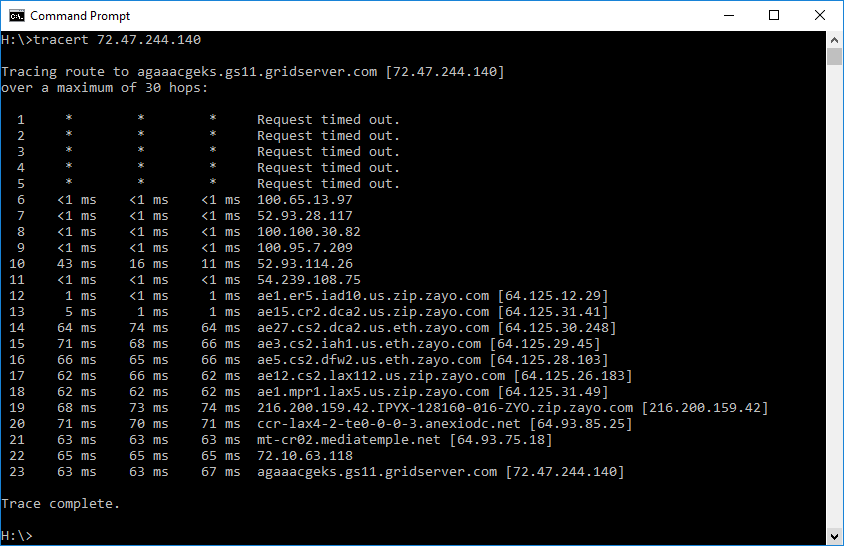
To trace the route to a specific IP address, for example 72.47.244.140, type the following in the command window then press Enter: tracert 72.47.244.140
It can take a few minutes for the trace to complete. If you wish to abort a trace, press CTRL+C on your keyboard.
As the illustration below shows, each time the data packet reaches a router (a hop) along its way to the destination, tracert will report back information about that router. This information include the IP address and hostname, if available, of the router, and the time it took between each hop.
tracert <URL> - Trace Route to a Specific Website
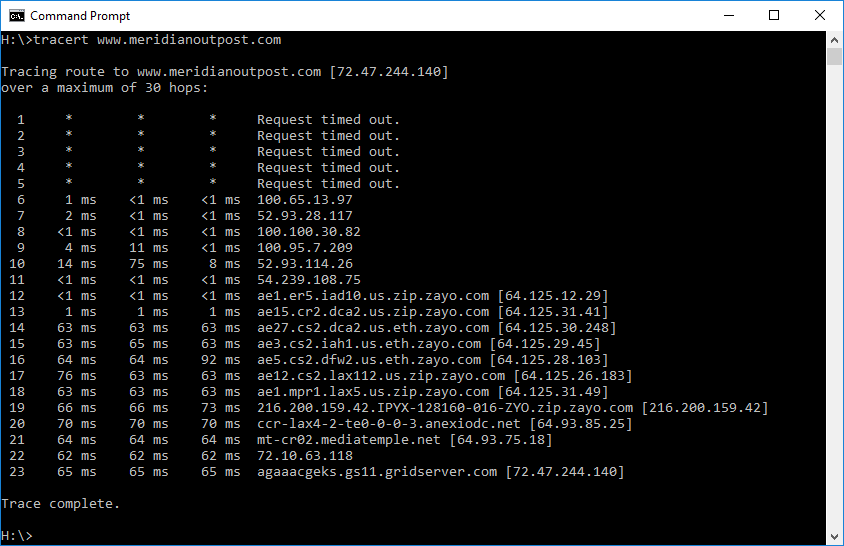
To trace the route to a specific domain, such as www.meridianoutpost.com, type the following in the command window then press Enter: tracert www.meridianoutpost.com
It can take a few minutes for the trace to complete. If you wish to abort a trace, press CTRL+C on your keyboard.
tracert -h - Set the Maximum Number of Hops to Trace
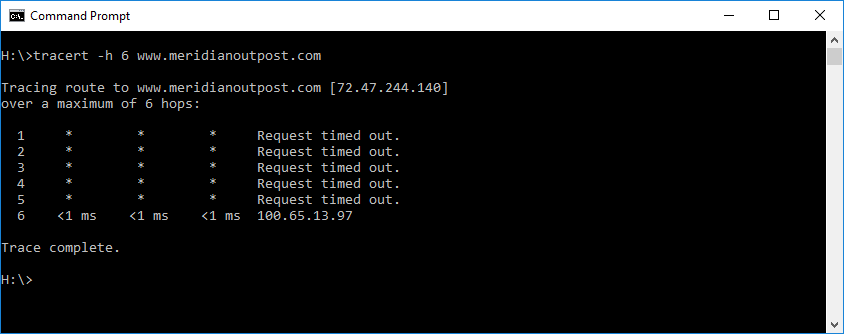
By default, tracert will trace the complete pathway from your computer to the remote host. However, sometimes you only need to trace up to a specific router or a specific number of hops. Limiting a trace to just a specific number of hops will help you use tracert more efficiently. By using the -h switch, you can specify the maximum number of hops tracert will go through.
For example, to trace to the 6th hop to the website www.meridianoutpost.com, type the following in the command window then press Enter: tracert -h 6 www.meridianoutpost.com
tracert -d - Skip Reverse Lookup to Speed Up Tracert
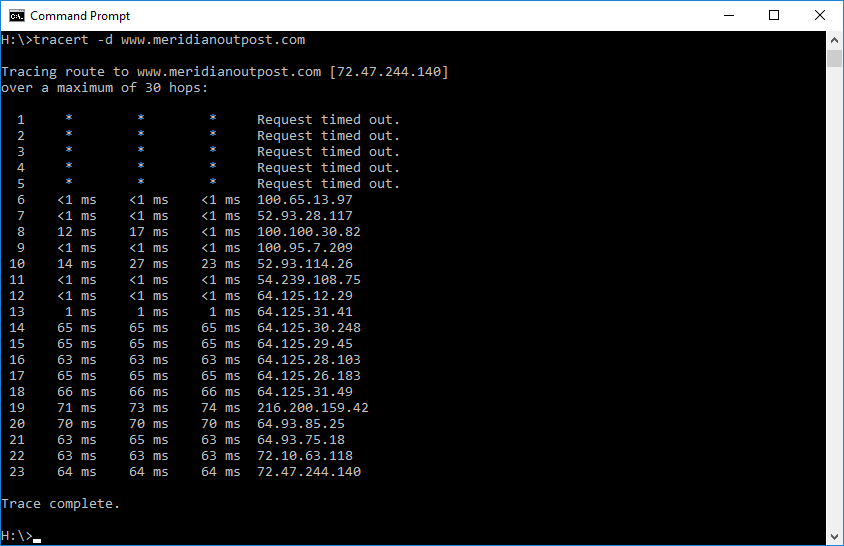
By default, tracert will perform a reverse IP lookup to identify the hostname for each hop. If there is no hostname available, tracert will have to wait for a timeout before it continues to the next hop. Waiting for the timeout can account for the majority of time it take tracert to complete a trace. If knowing the hostname is not important for your troubleshooting efforts, you can use the -d switch to skip this lookup.
For example, to perform a trace to www.meridianoutpost.com without resolving IP addresses to host names, type the following in the command window then press Enter: tracert -d www.meridianoutpost.com
Reading Tracert Results
The information in a tracert reports can look overwhelming. This section will help you better understand what it means.
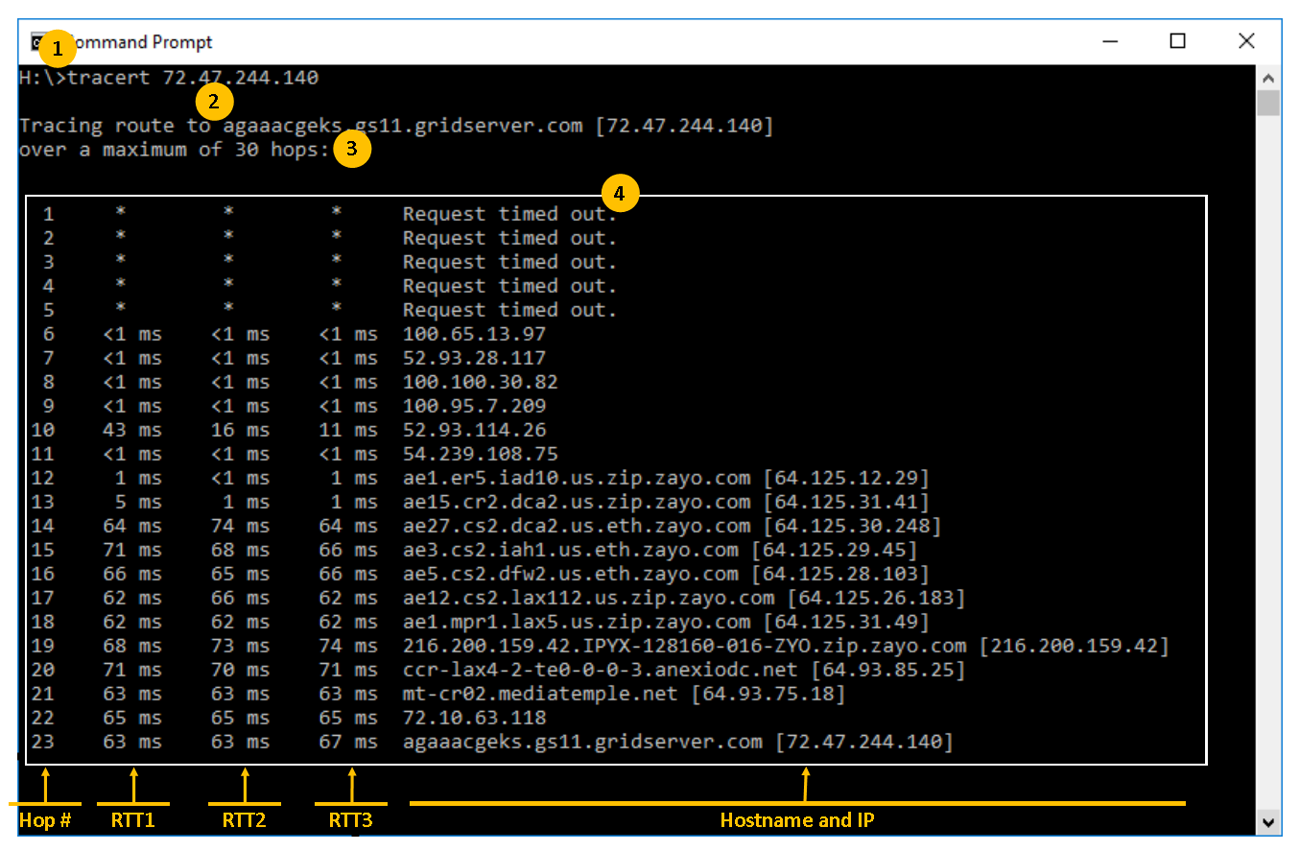
Area 1 - This is the tracert command that was typed
Area 2 - This shows what tracert is performing. In the example illustration, it is performing a trace to the destination IP of 72.47.244.140, which a reverse lookup identifies this with a hostname of agaaacgeks.gs11.gridserver.com.
Area 3 - This is the maximum number of hops that will be used to trace the route. For Windows tracert, the default is 30 hops. This means, tracert will only trace to the first 30 routers. This parameter can be increased by using the -h switch if necessary.
Area 4 - This portion of the tracert output shows information on each hop that handled your data packet to help it along to the destination. There are five columns of data shown in this report.
- Hop Number - This is the first column and is simple the number of the hop in the network pathway from your computer to the remote device. The highest this will go to will be no more than the Windows tracert of 30, or what you define using the
-hswitch. - Round Trip Times (RTT) - Expressed in milliseconds (ms), these three columns report the time it took for a data packet to go from your computer to the hop and back to your computer (sometimes refer to as latency). By default, Windows tracert sends three packets to each hop. Thus, each hop line in the report will show three round trip times. In the illustration below, these are highlighted as RTT1, RTT2, and RTT3.
- Host Name / IP - This last column shows the hostname and the IP address of the hop.
Analyzing Tracert Results
Round Trip Times (RTT)
- RTT (latency) is the main thing you want to focus on in your tracert report. For these values, the lower the number, the better. You also want to see fairly consistent times for each hop.
- RTT above 150ms within the United States is considered to be long, but may be normal if the remote device is in the opposite side of the world.
- If an asterisk (*) appears for RTT instead of a time, this indicates that the packet was not received back within the expected time frame. For Windows tracert, the default is 4,000 milliseconds (or 4 seconds). This parameter can be increased by using the
-wswitch if necessary. Seeing one or two asterisks does not necessarily indicate a problem. Routers can be configured to limit the number of ping or tracert packets it responses to as a way to prevent them from being affected by denial-of-service attacks. - If there are three asterisks followed by a Request Timed Out message, there can be a few reasons for this:
- If this appears at the beginning of a tracert report, it can be ignored as it is often due to the device configured to not respond to ping and tracert packets.
- If this appears toward the end of a tracert report, it can indicate one of the following:
- Firewall - A security device (such as a firewall) at the destination network is blocking the request. However, this does not mean the destination device is not reachable (such as a web server). This only indicates that a security device is configured to not response to ping or tracert packets.
- Problem with Return Path - As mentioned, RTT measures the round trip time a packet traverse from your computer to the router and back. The pathway to the hop is often not going to be same for the return trip.
- Problem with Remote Device - The remote device is not configured correctly or has system problems affecting your connection.
- A progressively increase in latency to the remote device can indicate an issue starting with the hop where the sudden increase began.
- A high latency in the middle of your tracert report does not necessarily indicate a problem as the associated router may have be configured to respond to ping and tracert packets with low priority.
- A high latency at the beginning of a tracert report (the first two hops) may indicate issues with your local network or Internet Service Provider (ISP). To resolve, contact the I.T. department of your organization or your ISP.
Other Usages and Getting Help
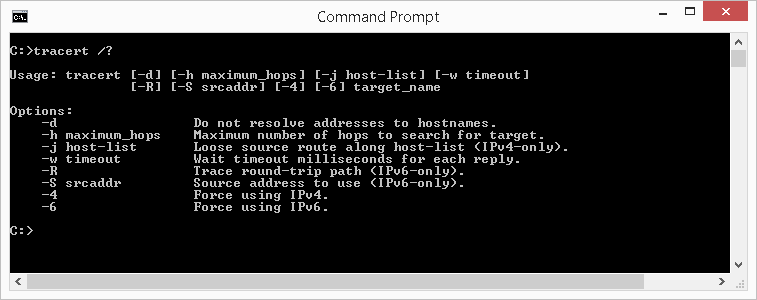
The example usage described in the article shows only some of the sub commands available with tracert. To get a list of the available switches, type the following in the command window then press Enter: tracert /?
Tips
General Tracert Tips
- If pinging a host fails, try using the tracert utility to identify where the data packet is failing along its route.
- RTT of over 150ms, within the United States, is considered high. If your remote host is on another continent, RTT of over 150ms may be normal.
- A network device must be configured to response to ping or tracert packets (ICMP echo requests), otherwise you will see asterisks for RTTs.
- Use the
-dswitch to skip reverse IP lookup to speed up tracert.
Example of a Good Tracert Result
The following is an example of a good tracert result. On hop 9, the device did not respond, as indicated with the asterisks.. However, because hop 10 responded, we know hop 9 was able to handle the packet to move to forward to the next hop. In this scenario, the router on hop 9 is likely configured to not response to ICMP packets, but it is functioning properly to in routing data packets. A tracert result with no asterisks is also a good result.
1    13 ms    22 ms    25 ms  52.93.114.64
1    <1 ms    <1 ms     1 ms  54.239.108.177
2    <1 ms    <1 ms    <1 ms  64.125.12.29
3     2 ms     2 ms     2 ms  64.125.31.41
4     65 ms    65 ms    65 ms  64.125.30.248
5     65 ms    66 ms    65 ms  64.125.29.45
6     65 ms    65 ms    65 ms  64.125.28.103
7     82 ms    65 ms    65 ms  64.125.26.183
8     65 ms    65 ms    65 ms  64.125.31.49
9     *        *        *      216.200.159.42
10    64 ms    65 ms    64 ms  64.93.85.25
11    66 ms    66 ms    66 ms  64.93.75.18
12    65 ms    65 ms    65 ms  72.10.63.118
13 64 ms 64 ms 64 ms 72.47.244.140Example Tracert Result of a Failed Hop
The following is an example of a tracert result.showing a failed hop.Starting with hop 9, we see all hops from that point forward are not responding. This indicates hop 9 is faulty or mis-configured and not forwarding traffic to the next hop. Hop 9 is where you want to start your troubleshooting.
1    13 ms    22 ms    25 ms  52.93.114.64
1    <1 ms    <1 ms     1 ms  54.239.108.177
2    <1 ms    <1 ms    <1 ms  64.125.12.29
3     2 ms     2 ms     2 ms  64.125.31.41
4     65 ms    65 ms    65 ms  64.125.30.248
5     65 ms    66 ms    65 ms  64.125.29.45
6     65 ms    65 ms    65 ms  64.125.28.103
7     82 ms    65 ms    65 ms  64.125.26.183
8     65 ms    65 ms    65 ms  64.125.31.49
9     *        *        *      Request timed out
10    *        *        *      Request timed out
11    *        *        *      Request timed out
12    *        *        *      Request timed out
13 * * * Request timed outExample Tracert Result of a Routing Loop Problem
The following is an example of a tracert result showing a routing problem. Starting with hop 8 and hop 9, our packet is bouncing back and forth between these two routers (routing loop). The packet will continued to be passed between 64.125.31.49 and 216.200.159.42 until the maximum hop count is reached (30 is this example) or until the session times out. With a routing loop problem, data will not reach the intend destination.
1    13 ms    22 ms    25 ms  52.93.114.64
1    <1 ms    <1 ms     1 ms  54.239.108.177
2    <1 ms    <1 ms    <1 ms  64.125.12.29
3     2 ms     2 ms     2 ms  64.125.31.41
4     65 ms    65 ms    65 ms  64.125.30.248
5     65 ms    66 ms    65 ms  64.125.29.45
6     65 ms    65 ms    65 ms  64.125.28.103
7     82 ms    65 ms    65 ms  64.125.26.183
8     65 ms    65 ms    65 ms  64.125.31.49
9     65 ms    65 ms    72 ms  216.200.159.42
10    64 ms    65 ms    64 ms  64.125.31.49
11    66 ms    66 ms    66 ms  216.200.159.42
…
…
…
29    64 ms    65 ms    66 ms  216.200.159.42
30 64 ms 64 ms 64 ms 64.125.31.49Redirect Output to Text File
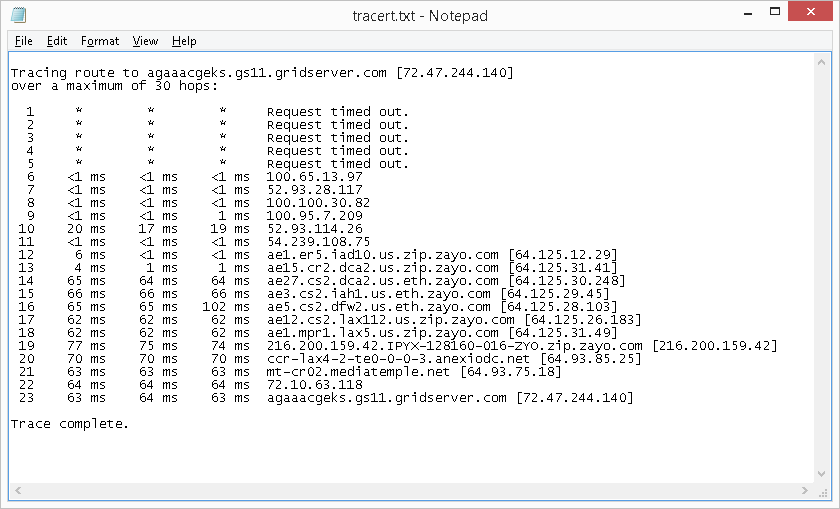
- Instead of displaying the results on the screen, you can have the results saved automatically to a text file on your computer. To do this, simply use the ">" symbol followed by the folder path and file name of your choice. For example, to redirect the output of tracert 72.47.244.140, type the following in the command window then press Enter:
tracert 72.47.244.140 > c:\temp\tracert.txt
This will create a file named tracert.txt in the folder path c:\temp that will have your result. You can then open this file with any text editor, such as Notepad on a Windows computer, as illustrated below.
Recommended Reading
Improve confidence and job performance
Improve productivity and efficiency
Learn more,
earn more
Life-long
investment
An investment in knowledge always pays the best interest.
Summary
The tracert utility is a valuable tool for troubleshooting network issues, particularly for large networks. It will help you identify where a problem lies on a network if you are unable to reach a remote host. If you are a network administrator or network engineer, this is a great utility to become familiar with.
Back to Top


